Updating Application Instructions
Configuring any hardware-software based system like Arduino Control Center usually is not a trivial task even for advanced users. You have to get familiar with hardware-software relations, in the Arduino environment, you have to deal with connections, sensors, wiring problems and at the same time, learn software programming concepts and how to perform certain tasks in the best way.
Once you successfully accomplish that, you don't want to touch anything! It works, you don't want to brake working configurations with software - firmware updates!
Updating Arduino Control Center is an easy task if it not includes firmware update. Firmware update requires USB(serial) connection, and if the Arduino board is controlled over the network, it has to be upgraded with a laptop in order to avoid detaching Arduino peripheral devices.
So, when is time to update Arduino Control Center and firmware in your Arduino boards?
It is always recommended to backup your current configuration by coping entire Arduino Control Center(your version) folder. ACC has all setup configurations and files, including database and compatible firmware, in a single folder.
1. Lets us say that you have installed ACC:
- major version 2, minor 3, maintenance(patch) 1 (v 2.3.1) and included latest firmware version 2.1
Updating software to minor 4 or any maintenance(patch) number(2,3,...50) will not break any of your configurations, both hardware, and software. You can always see release notes which may consist of some ACC bug fixes or new features, compatible with your current software and Arduino firmware versions.
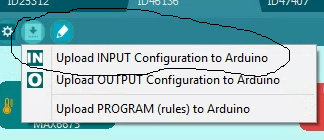
If is in newer version is included support for a new type of sensor for example, firmware version included in a package will be also newer but it won't be necessary to update firmware, except if you want to use this newly added support for sensor. When you added component which represents this sensor in Arduino Control Center and press Upload Input Configuration:
nothing will happen, component icon will remain greyed because a component is not recognized in firmware and therefore ignored and no data will arrive from Arduino to display on the component.
Update application:
In order to update the application, go to Help - Check For Updates, and if a newer version is available, the update window will show up. Check release notes, press Download button and download the latest version.
After download finished, you will be prompted if you want to install latest version. After confirming, the Updater application will show up, and the Start update button will begin the update Press close button in order to restart ACC, or restart ACC manually by clicking on desktop shortcut.
Updated version will match to your current version(demo) or paid version(ONE,FULL,PRO)
2. Let us say that you have installed ACC:
- major version 2, minor 3, maintenance(patch) 1 (v 2.3.1) and included latest firmware version 2.1 and you want to update to 3.0.0 version with included version 3 firmware.
First, backup your current configuration by coping entire Arduino Control Center(your version) folder. ACC has all setup configurations and files, including database, in a single folder.
Upgrading firmware from 2.1 or any previous version to 3.0 version now is required, in order to all configurations work as it should.
Update application:
In order to update the application, go to Help - Check For Updates, and if a newer version is available, the update window will show up. Check release notes, press Download button and download the latest version.
After download finished, you will be prompted if you want to install latest version. After confirming, the Updater application will show up, and the Start update button will begin the update Press close button in order to restart ACC, or restart ACC manually by clicking on desktop shortcut.
Updated version will match to your current version(demo) or paid version(ONE,FULL,PRO)
Upgrade Firmware (USB connection is required!):
Select Arduino board, go to Tools - Update firmware and update Arduino firmware to the latest version.
Upload all Input, Output and Rules Configurations:
As you can see in above image, press Upload INPUT configuration to Arduino, then press Upload OUTPUT configuration to Arduino and at the end press Upload PROGRAM(rules) to Arduino.
If any conflict with configuration in Arduino EEPROM is triggered, you will receive message from Arduino that conflict exists and configuration in EEPROM will be cleared.
Repeat step with uploading configurations and test the application with new firmware.